 |
|||
 |
|
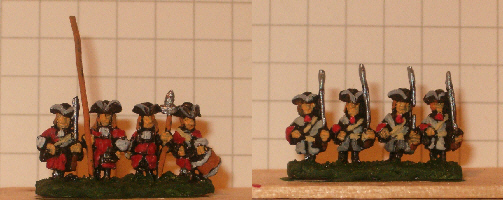
The Brush Monkey Is Loose Well, let’s just wait a minute. Along with the figures themselves, Peter also provided a painting guide (BTW he sells CD-ROMs with uniform details for this period off of his web site). Time to take a look and plan out what the color scheme will be. Mine is an Austrian (aka Imperial) Army, comprised of 4 infantry battalions (Guttenstein, Wuertemberg, Hoch und Deutschmeister, and Kreischbaum for those of you keeping score at home); 1 Dragoon regiment (Bayreuth); 4 cuirassier regiments (Caprara, Jung Hanover, Pfalz Neuberg and Pallfy). One of these is my CinC stand as well. The infantry uniforms are light gray with colored facings, turnbacks and trousers. The Cuirassiers are black armor over light golden brown coats, with red turnbacks. These appear to have identical uniforms, the differences being the colors on the horse blankets. The Dragoons wear light blue coats with red facings and turnbacks. I decide to do one infantry regiment first. I’m going to do it the same way I would a 15 mm unit. Peter’s painting guide says this is a mistake and that attempting same leads to disappointment and frustration. I do not plan to do the entire army this way, but I want to see how good I can make them look. This is more important to me as I’m strictly a painter so far (though I’ve recently been shopping for Napoleonic and ACW rules sets). Peter’s technique is to paint from the base up to the hat. My usual technique is paint “in the order you’d get dressed,” that is flesh then clothes, then equipment, then final details. I’m doing the first regiment - the Guttenstein - my way, and we’ll see how it goes from there. The Guttenstein Regiment With a fast coat of Coat d’Arms Tanned Flesh, Model Master Flat Gull Gray on the coats, a stripe of white for cross belts, and some key items in Colour Party Brunswick Black, we’re well on our way to a finished regiment. Here’s what one strip looks like so far:
Now for a few more fine details: Polly S Cherry Red for the facings and cuffs (for the command strip I’m doing a basecoat of Americana Deep Burgundy and will highlight with the Cherry Red). The equipment gets done in Vallejo Buff, though I’m leaving the cartridge boxes black (it’s just a personal thing - I like ‘em black). Ceramcoat Dark Brown is the next color for the musket stocks, drum body and wood bits on the command strip. Finally silver for the musket barrel and a band of white around the top of the tricorne. Voila, one completed regiment! Here’s a look:
The figures really are too small for the highlighting of 15 mm and it doesn’t really allow for some of the smaller detail to be called out. For example, the collars and turnbacks are too small to do in the facing color (well, for my abilities, anyway). And the lace atop the tricornes is beyond my skill. With thick paint you get the really wide stripes you see here. With thin paint, it ran all over the place and then the white barely showed up over the black primer. Still, from 3 feet it looks okay. So Peter really knows what he’s about. This regiment of 4 strips took me about an hour to paint from primer to finish, or about 4 minutes per figure. For the rest of the infantry I’ll be going for more speed, and I’ll let the black undercoat act as the highlighting. The colors are basically as above. Here’s what a finished strip looks like (and these took about 90 seconds per strip):
From any distance over 12 inches you can’t tell the slow paint job from the fast. The lesson: dab ‘n go. Next: All The King’s Horses |
|
[Home] [How To] [HT Paint 6mm] [HT_6mm_4] |
 |


