|
FOURTH SESSION: THIRTY MINUTES
Beginning Status: +9 Minutes
It’s time for the home stretch. This session should see the basic block painting completed. In order to get some depth of detail, I consider using a wash of brown ink, time permitting. But I need to keep an eye on basing. The worst case scenario here is to just tack the troops in place with white glue and paint the whole base green. Then I can easily pop them off after the battle for touch up and a real basing job with flocking, etc. We’ll just have to see how things go from here.
I drag out my final colors and the brown ink, just in case. I’ve selected Howard Hues Musket Brown for the muskets and hair, Model Master Silver, Bright Brass and Silver (all three are oil based, not water based) for the details, Model Master British Crimson for the officers’ sashes and I will mix my own blue-gray for the canteens. My flat white will be Model Master as well. for the muskets and hair, Model Master Silver, Bright Brass and Silver (all three are oil based, not water based) for the details, Model Master British Crimson for the officers’ sashes and I will mix my own blue-gray for the canteens. My flat white will be Model Master as well.
In looking at the figures, I decide I will have time for the brown ink wash (I’ll use those extra nine minutes, if necessary). I decide to do the hair, muskets and canteens, then do the brown ink wash. I’ll end up with the metallic highlights and flat white. This will give me my shading, while letting my white straps and shako cords “pop” and give my troops a real distinctive red and white presence. And then...
DISASTER STRIKES
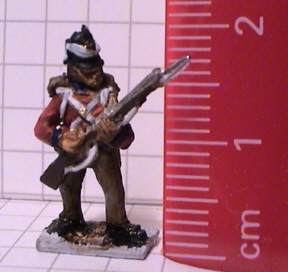
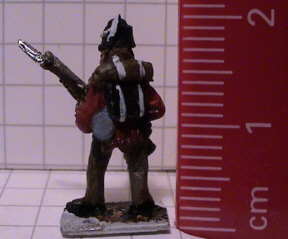
The details are drying and it’s time for the brown wash. I mix the Citadel Brown Ink as I have many times before. I decide on a heavy wash and mix it at seven parts water to two parts ink. I get out my slathering-brush and lay it on. I confess that since I’m washing the entire figure, my attention wanders. Perhaps the Audioslave CD drew me in (by the way - that CD has been in my player for months now - if you like hard rock when you paint this is a GREAT CD). Perhaps I was a bit tired. Or bored. Who knows. But, after ten minutes or so I have all my figures washed. I clean my brush and take a snack/internet break so the ink can get good and dry before I resume painting. When I come back I nearly choke on my munchies. I’ve created a nightmare - chocolate dipped miniatures!
The ink has not settled into the crevices, it has covered almost like paint. My gray trousers and  bedrolls are brown. Fortunately the color seems to blend over the red jackets and the rest of the figures, but these are not good looking minis. I’m so hacked off I decide to sleep on it. After a night’s sleep and some calm reflection (aka a glass of cheap Shiraz) I decide to repaint the trousers and bedrolls and leave the rest to the gods, hoping the final details will lighten the figures. I briefly consider trying to dry brush the gray but I think it will take far too much time. I opt for the big brush block painting fix. The repainting takes 14 minutes. I am now 6 minutes behind schedule with no place to make it up. bedrolls are brown. Fortunately the color seems to blend over the red jackets and the rest of the figures, but these are not good looking minis. I’m so hacked off I decide to sleep on it. After a night’s sleep and some calm reflection (aka a glass of cheap Shiraz) I decide to repaint the trousers and bedrolls and leave the rest to the gods, hoping the final details will lighten the figures. I briefly consider trying to dry brush the gray but I think it will take far too much time. I opt for the big brush block painting fix. The repainting takes 14 minutes. I am now 6 minutes behind schedule with no place to make it up.
After the gray, I do all the metal bits, using Bright Brass for the officer’s lace instead of gold to save time. I use Steel for the muskets and silver for the bayonets. I always like silver bayonets - even if steel or gray would be more true to life, it’s a final touch that I think gives the figure a touch of polish. After the metal, the white bits are the last touch. Plumes, shako cords, straps and rifle slings all get a nice heavy dose. The officers get a splash of crimson.
It’s all over but the basing. My basing time is down to 24 minutes.
|


