 |
|||
 |
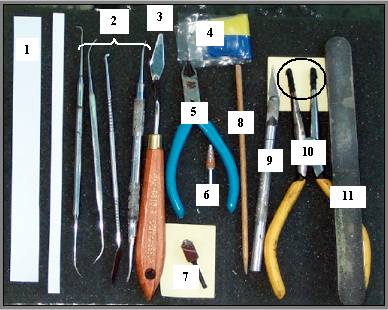
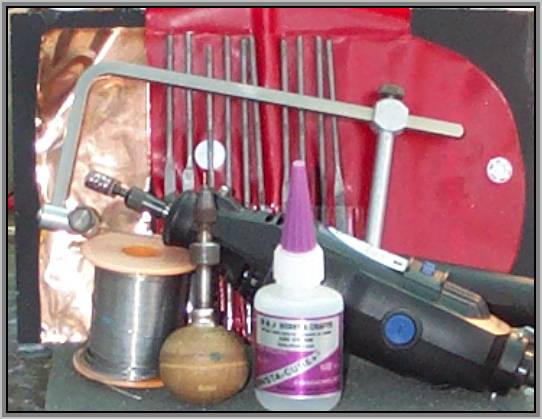
Item #1 are strips from sheets of soft styrene plastic. This styrene must be ‘soft’ so that it can bend and be ‘reshaped’ to any contour. For 28 mm conversions, two sizes are useful; .020” thickness and .012” thickness. The .020” thickness is useful for belts and straps, while the .012” thickness can be used to ‘lay’ strips of segmented ‘armor’ and the-like. Both sizes can be used as a ‘cutout form’ to provide the basic shape to ‘build’ additional equipment/uniform modifications onto the figure. Both of these sizes are manufactured as 7.6x12.6” White Styrene sheets and marketed as/by Raboesch Super Sheets (Netherlands). These sheets are available in most good hobby/model stores. Item #2 are various dental tools that, for the main, the author has collected from his dentist over the years. These tools can be used to define detail and to ‘smooth’ surfaces on green/gray/white/brown ‘stuff’ (modeling medium) during the modification process. Recently, several manufacturers have made these tools available at hobby/model shops and on Internet sites. Item #3 is a thin and flexible painting ‘spatula’. When wetted with saliva, this item can be one of the best smoothing tools available (second only to ‘the finger’) when working with your modeling medium. A variety of shapes and sizes of these tools is available from/as Connoissuer (Italy). The author uses models 6810 4 (pictured) and 6810 8. Item #4 is a ribbon of ‘green stuff’ and is one of the primary modeling medium of the industry. The author has been working with this medium since the early 1980’s when it was sold over the counter as Plumber’s Epoxy. It consists of a ‘dual’ ribbon of yellow and blue which, when combined (mixed) produces a green modeling medium for figure design and/or conversion. The author uses green stuff to (1) add/alter/design details and ‘fixtures’ on miniature figures, (2) as an epoxy-glue to affix modifications to miniatures/models, and (3) as a gap filler. Any serious modeler should learn to work with this or similar medium for conversions. The green stuff medium is currently sold by the original manufacturer by/as Kneadatite7 and is available in Blue/Yellow (medium compound), Brown/White (hard compound – sands much better), and Blue/White (soft compound) ribbons. If you purchase the 3.52 oz canister, cut off what you will use in the immediate future and put the rest in the freezer! It will extend the life cycle indefinitely. Similar products are also marketed by Games Workshop as Epoxy Putty and by Amazon Miniatures as Grey Matter Sculpting Putty. Item #5 is a small wire cutter (clipper) commonly known by the slang term ‘a pair of dikes’. It is used to cut metal. These wire cutters are available from any general-purpose hardware store. Item #6 and Item #7 are Dremel7 tool fixtures. Both fixtures are used to remove unwanted detail and metal from the figure. Item #6 is a grinding post; item #7 is a sanding band (120 Grit). Dremel7 fixtures are available at most hobby/model shops. Item #8 is a thin wooden shaft, similar to a skewer stick, with one end pointed and the other end squared off and tapered to a flat surface. This is the author’s tool of choice for applying and distributing the modeling medium (green stuff) on the figure, rolling/pushing it into place, and obtaining an initial ‘semi-smooth’ surface. This tool works best on the modeling medium when wetted with saliva. Wooden shafts similar to this one may be purchased from artist supply retailers that support clay sculpting. This tool is simply called the stick throughout the article. Item #9 is a metal handled scalpel, hobby knife or Xacto7 tool. The sharp blade is used to trim away excess detail and figure flash. All hobby/model shops sell this tool. Item #10 is a common pair of needle-nose pliers, with the pincher ends covered with electrical ‘shrink tubing’ so as to blunt the teeth grip of the pliers. This tool is used to gently grasp hands, arms and the-like in order to provide the necessary leverage to bend and twist the figure into a new position. The pliers are available at all hardware stores. The shrink tubing may be purchased at most electronic supply retailers. A note on ‘shrink tubing’. This item is made to shrink when heat is applied. It’s primary purpose is to tightly bind cable/wire runs in the electronics assembly industry. To blunt the teeth of the pliers, simply place an appropriate sized tube over the teeth and heat the tube with a match, lighter, or even a hair dryer. The tubing will shrink to-fit! Place a second tube over the fitted first tube and repeat the heating process. The author has found that two layers of shrink tubing works best to blunt the teeth. Item #11 is a sanding board that contains four graduated grades (grits) of sanding surface; two grades on one side and two on the other side. This sanding board is used to smooth flat surfaces, separate weapons, original shield designs, et al. Sanding boards can be purchased at some model retailers. Other useful items not illustrated in figure 2. include; the Dremel7 tool motor assembly, a hand cutting saw (‘hack’ or hobby saw) with fine blades, rolls of various thickness copper sheets, ‘super’ glues, a pin vice with various size drills-bits, various lengths and thickness of ‘piano’ wire, and various shaped small files.
Figure Conversion – An Overview Figure conversion techniques may tentatively be classified as Beginner, Intermediate, and Advanced. Although these categories are somewhat arbitrary, they serve well for this article. The author defines each of these classifications as;
Most artistically challenged wargamers (including the author of this article), with patience and practice, can successfully implement both the Beginner and the Intermediate level techniques. These are the techniques used by the figure technician. However, the Advanced techniques are best left to the natural artist. This article presents only Beginner and the Intermediate level techniques for figure conversion. This section begins by presenting a detailed step-by-step guide through the conversion process, implementing both Beginner and Intermediate-level techniques. This first conversion contains the lion’s share of ‘how-to’ detail. Following this example, several figure conversion results are viewed, accompanied by an overview of the basic techniques required to perform each conversion. Any new techniques not described by the first (step-by-step) conversion will be detailed, as necessary.
|
 |

